I reset all the Arduino slaves to the new I2C addresses starting at 14 through 1C. When I installed Raspbian 64-bit Raspi OS and enabled I2C and other features, 00 – 07 are now used by the Pi.

sudo i2cdetect -y 1
     0  1  2  3  4  5  6  7  8  9  a  b  c  d  e  f
00:                         -- -- -- -- -- -- -- --
10: -- -- -- -- 14 15 16 17 18 19 1a 1b 1c -- -- --
20: -- -- -- -- -- -- -- -- -- -- -- -- -- -- -- --
30: -- -- -- -- -- -- -- -- -- -- -- -- -- -- -- --
40: -- -- -- -- -- -- -- -- -- -- -- -- -- -- -- --
50: -- -- -- -- -- -- -- -- -- -- -- -- -- -- -- --
60: -- -- -- -- -- -- -- -- -- -- -- -- -- -- -- --
70: -- -- -- -- -- -- -- --
My first test of the Siglent SDS1104X-E oscilloscope set to serial-I2C. Yellow is channel 1 : SCL and Pink is channel 2 SDA.
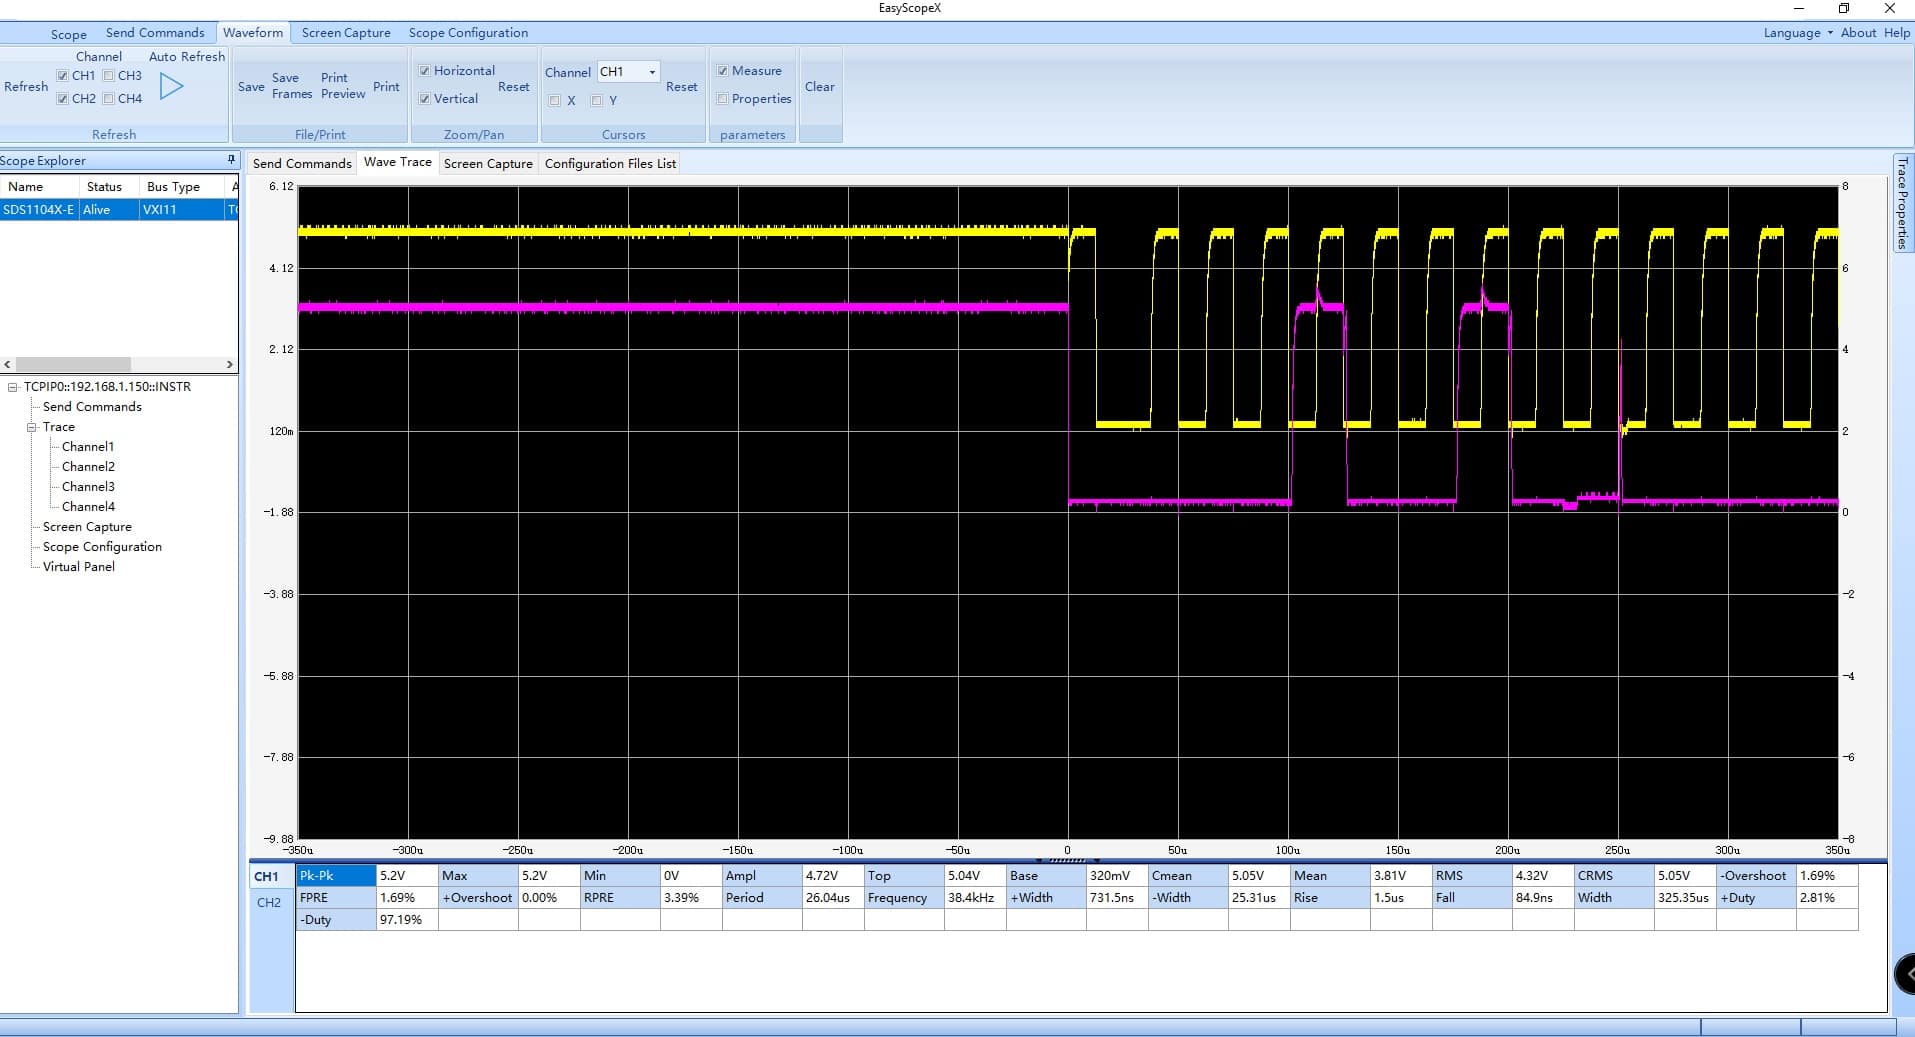
I2C or I2C is short for Inter-Integrated Circuit, a synchronous serial communication protocol developed by Phillips for communication between a fast Microcontroller and relatively slow peripherals (like Memory or Sensors) using just two wires. Hence, it is sometimes also known as TWI (Two Wire Interface). It can support 112 devices and run over 1 meter in length with proper setup.
You have a SDA (Data pin) and SCL (Clock Pin). It allows many devices to only use 4 wires to connect. You have VCC, Ground, Clock and Data pins.
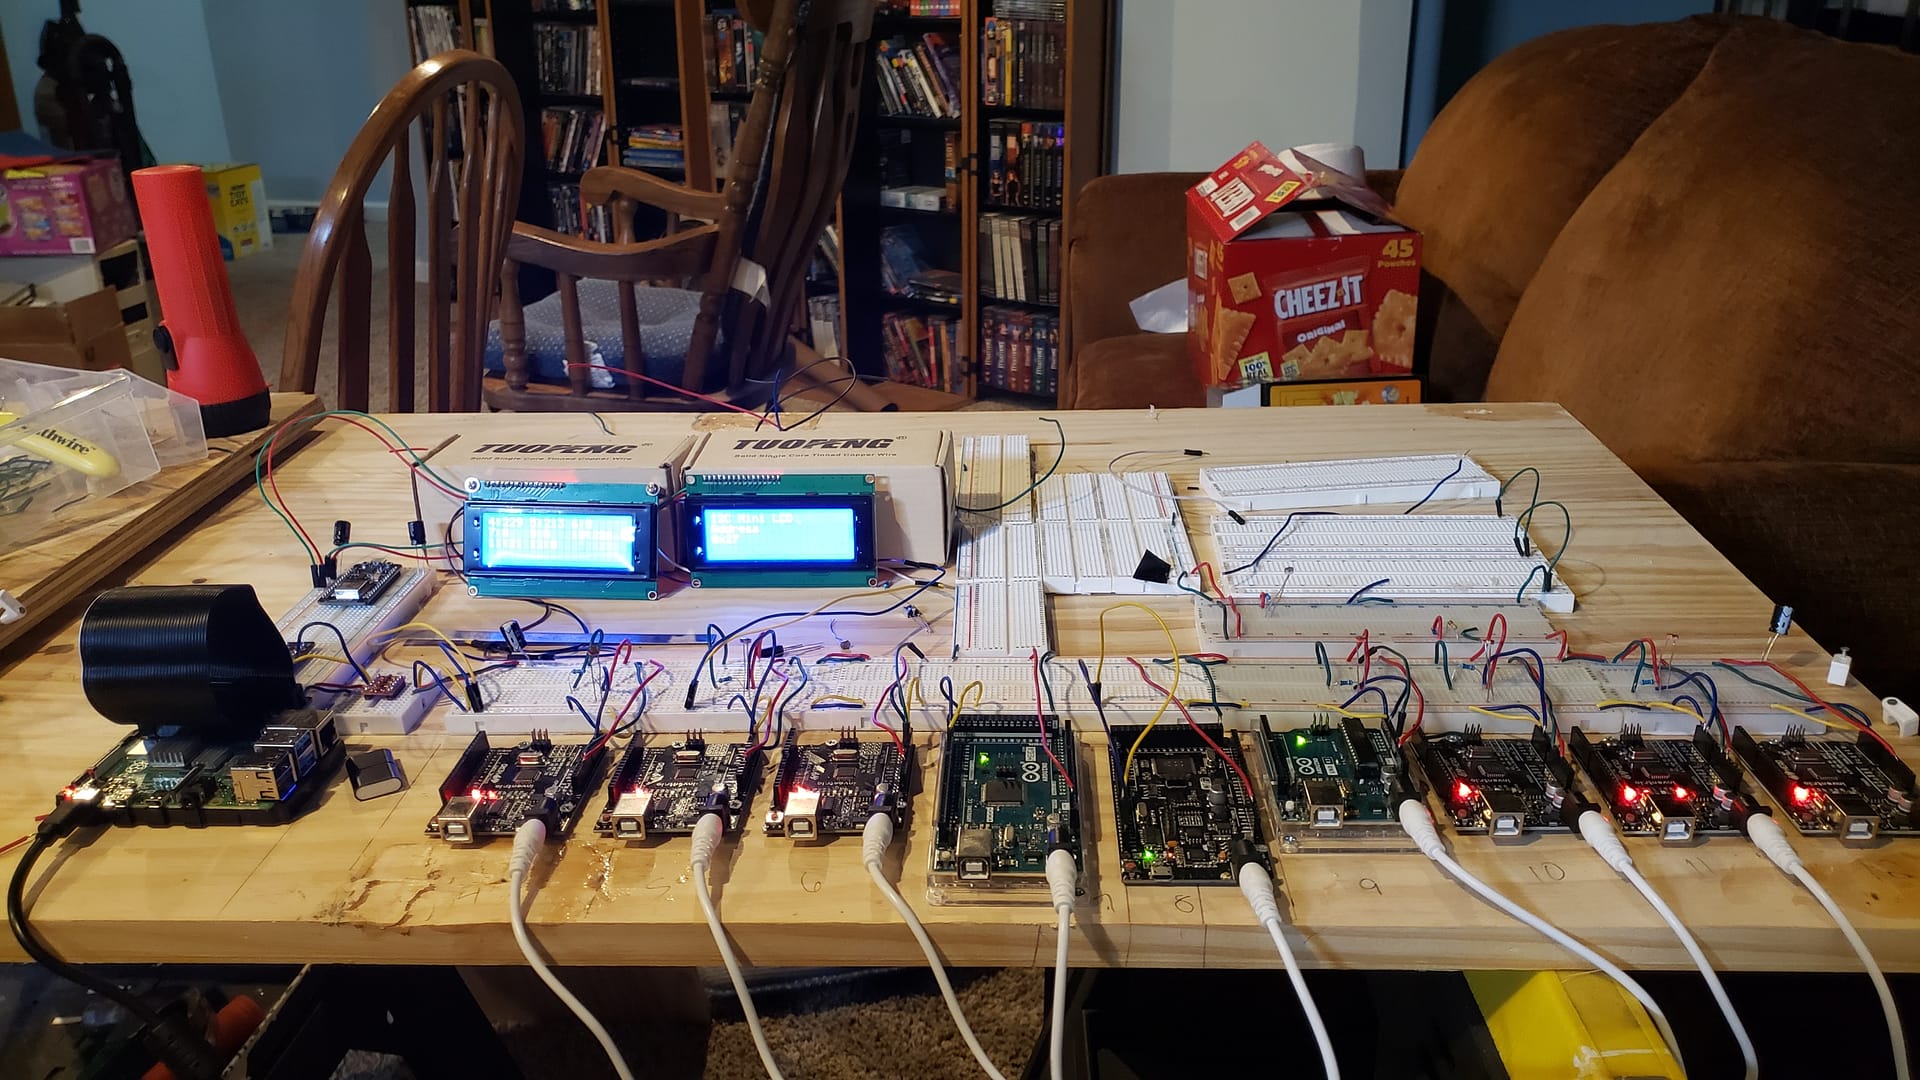
The breadboard in front of the Arduino devices has two +/- power rails. The one closest to the Arduino device uses blue and yellow wiring. Blue = SCL (Clock)
Yellow = SDA (Data)
The top +/- power rail connects the 5V and Ground
Red = 5V VCC
Green: Ground
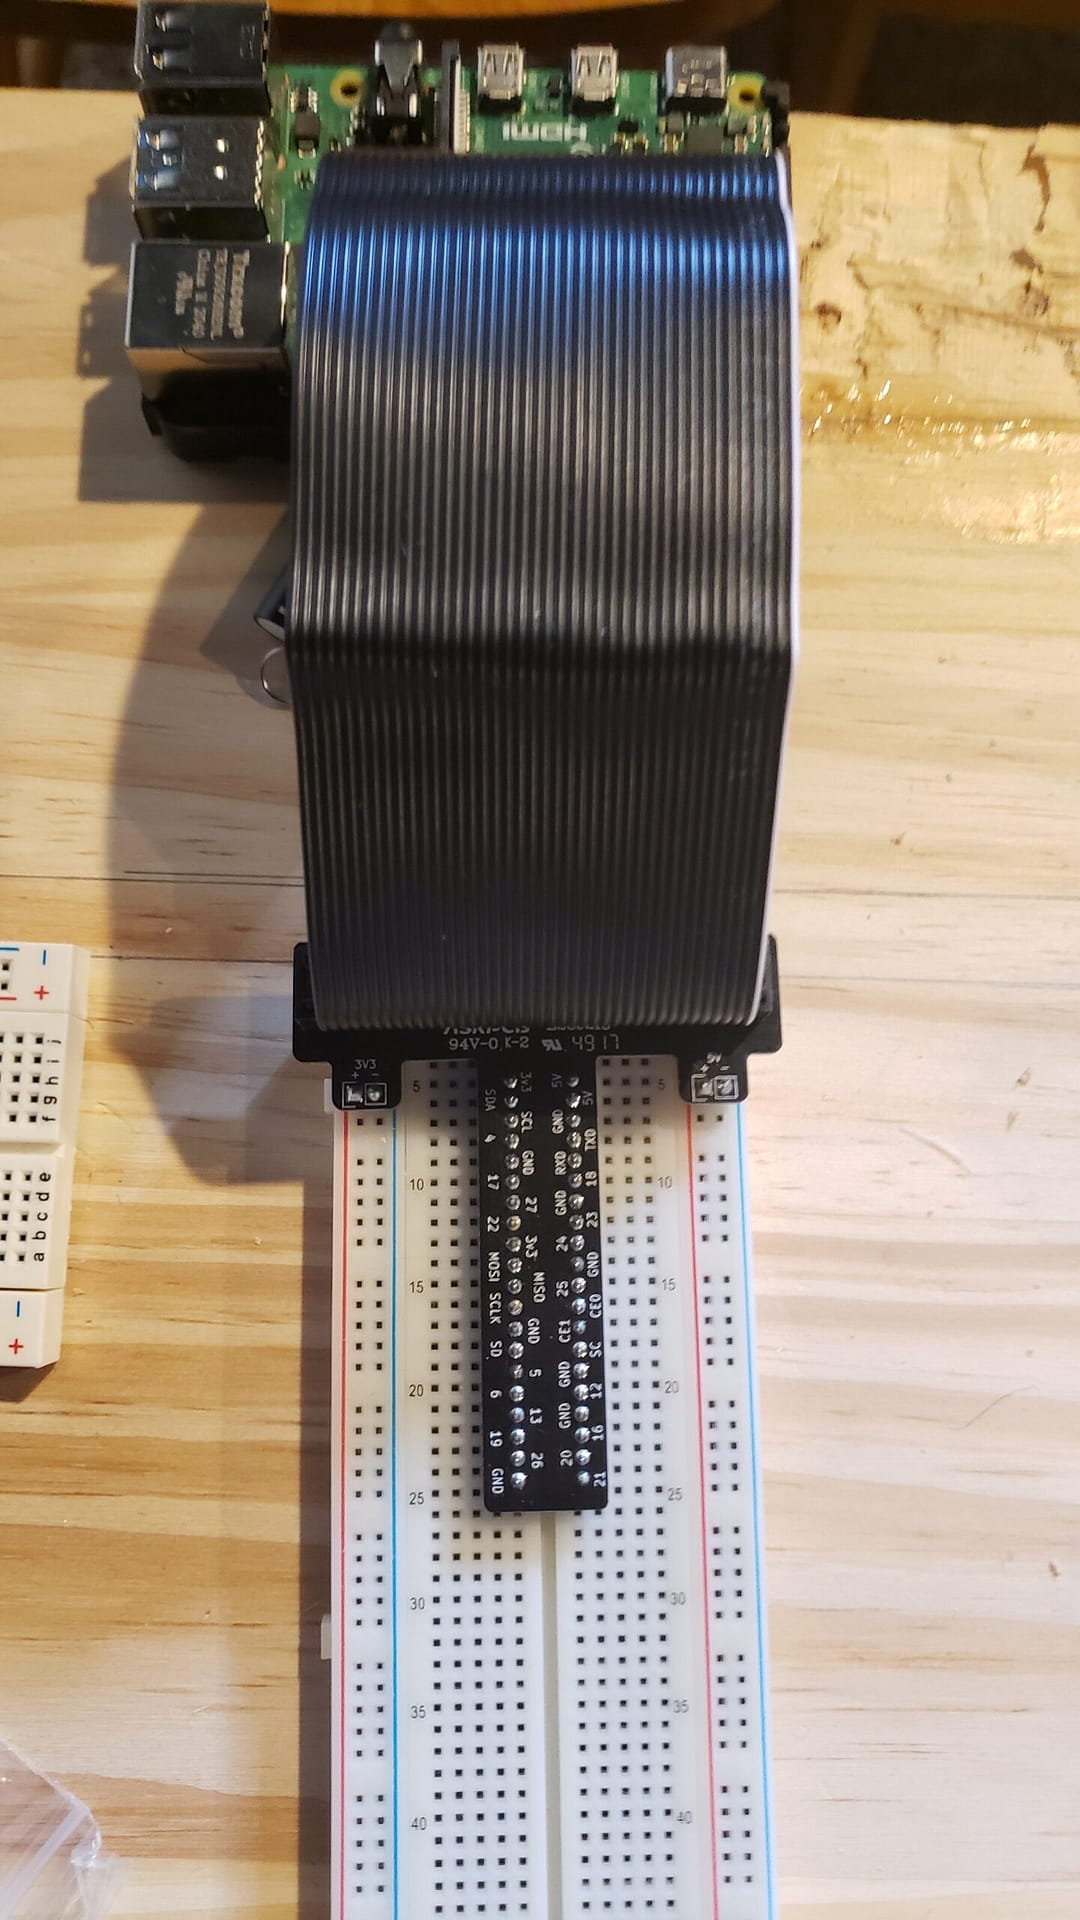
The Raspberry Pi T-Cobbler has 5V on left side and 3.3V on right side power rails. The Sparkfun Bi-Directional Logic Level Converter allows 3.3V on left side for the Raspberry Pi and 5V on right side for Arduino devices. It has the I2C Bus connecting through the component. Raspberry Pi is the Master and Arduino devices are all slaves. The Raspberry Pi is a Micro-computer that is more powerful than the Arduino devices and easier to program.
Raspberry Pi OS with Kernel 6.6.5 from December 2023 is installed on the Raspberry Pi. It is 64 bit. I connected the I2C LCD screens to it in this picture.
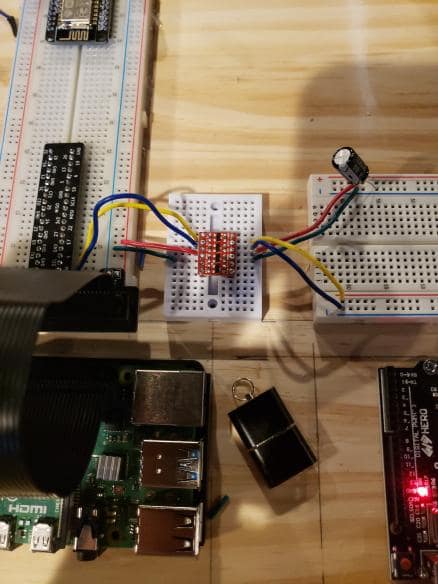
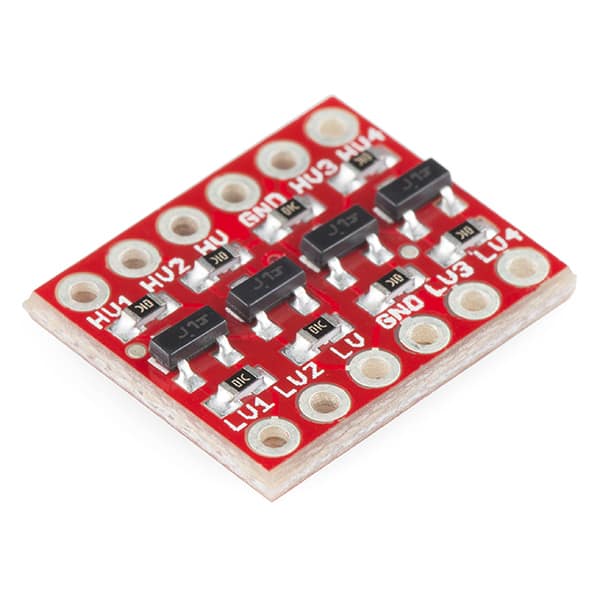
This could go in both Arduino and Raspberry Pi sections. I have a SparkFun Logic Level Converter – Bi-Directional (LLC-BD) module. The red device in the middle. On one side is LV (Low Voltage) and the other side is HV (High Voltage). Low Voltage is the 3.3V Raspberry Pi and the High Voltage is the 5V Arduino UNO. Grounds are connected across along with each pins 1,2,3,4. So LV1 goes to HV1. This device is I2C capable. The Arduino has both 3.3V and 5V connected to the LLC-BD.
Raspberry Pi 5V
The 5v pins give direct access to the 5v supply coming from your mains adapter, less power than used by the Raspberry Pi itself. A Pi can be powered directly from these pins, and it can also power other 5v devices. When using these pins directly, be careful and check your voltages before making a connection because they bypass any safety features, such as the voltage regulator and fuse which are there to protect your Pi. Bypass these with a higher voltage and you could render your Pi inoperable.

Why have both Raspberry Pi and Arduino in I2C network? Arduino can do analog sensors. Raspberry Pi is a full microcomputer that can host LAMP components and your web site. You can put your photo resistors on the Arduino and use I2C to transfer the results in near real time to display on your Raspberry Pi web site. You can add a Turing pi and build clusters on Compute modules for your web site, kubernetes, and other fun projects.
Here are the basic I2C Configuration files for all the Raspberry Pi and Arduino devices. On the Raspberry Pi, you need to enable I2C in Raspi_config
pi.py
# basic_i2c_configuration

import RPi.GPIO as GPIO
import time
from smbus import SMBus

bus = SMBus(1) # indicates /dev/ic2-1

def destroy():
    GPIO.cleanup()

def setup():
    GPIO.setwarnings(False)
    GPIO.setmode(GPIO.BOARD)

def loop():
    print("")


if __name__ == '__main__':
    print ('Program is starting...' )
    setup()
    try:
        loop()
    except KeyboardInterrupt:
        destroy()
Ard_4_slave
// Wire Slave Receiver
// by Nicholas Zambetti <http://www.zambetti.com>

// Demonstrates use of the Wire library
// Receives data as an I2C/TWI slave device
// Refer to the "Wire Master Writer" example for use with this

// Created 29 March 2006

// This example code is in the public domain.

// 04-Feb-2018 mcarter adapted
#include <Wire.h>

const int ledPin = 13; // onboard LED
int ValueA3 = 0;
static_assert(LOW == 0, "Expecting LOW to be 0");

void requestEvent()
{
Wire.write(ValueA3);
}

void setup() {
  Serial.begin(9600);
  Wire.begin(0x4);                // join i2c bus with address #4

  Wire.onReceive(receiveEvent); // register event
  Wire.onRequest(requestEvent);  // send date to Pi

  pinMode(ledPin, OUTPUT);
  digitalWrite(ledPin, LOW); // turn it off
}

void loop() {
  delay(100);
}

// function that executes whenever data is received from master
// this function is registered as an event, see setup()
void receiveEvent(int howMany) {
  while (Wire.available()) { // loop through all but the last
    char c = Wire.read(); // receive byte as a character
    digitalWrite(ledPin, c);
  }


}
Ard_5
// Wire Slave Receiver
// by Nicholas Zambetti <http://www.zambetti.com>

// Demonstrates use of the Wire library
// Receives data as an I2C/TWI slave device
// Refer to the "Wire Master Writer" example for use with this

// Created 29 March 2006

// This example code is in the public domain.

// 04-Feb-2018 mcarter adapted
#include <Wire.h>

const int ledPin = 13; // onboard LED
int ValueA3 = 0;
static_assert(LOW == 0, "Expecting LOW to be 0");
int Checking_In = 1;


void setup() {
  Serial.begin(9600);
  Wire.begin(0x15);                // join i2c bus with address #4

  Wire.onReceive(receiveEvent); // register event
  Wire.onRequest(requestEvent);  // send date to Pi
  Wire.onRequest(ard_checkingIn);  // send date to Pi

  pinMode(ledPin, OUTPUT);
  digitalWrite(ledPin, LOW); // turn it off
}

void loop() {
  delay(100);
}

// function that executes whenever data is received from master
// this function is registered as an event, see setup()
void receiveEvent() {
  while (Wire.available()) { // loop through all but the last
    char c = Wire.read(); // receive byte as a character
    digitalWrite(ledPin, c);
  }
}

void requestEvent()
{

}

void ard_checkingIn()
{
Wire.write(Checking_In);
}
Ard_6
// Wire Slave Receiver
// by Nicholas Zambetti <http://www.zambetti.com>

// Demonstrates use of the Wire library
// Receives data as an I2C/TWI slave device
// Refer to the "Wire Master Writer" example for use with this

// Created 29 March 2006

// This example code is in the public domain.

// 04-Feb-2018 mcarter adapted
#include <Wire.h>

const int ledPin = 13; // onboard LED
int ValueA3 = 0;
static_assert(LOW == 0, "Expecting LOW to be 0");
int Checking_In = 1;


void setup() {
  Serial.begin(9600);
  Wire.begin(0x16);                // join i2c bus with address #4

  Wire.onReceive(receiveEvent); // register event
  Wire.onRequest(requestEvent);  // send date to Pi
  Wire.onRequest(ard_checkingIn);  // send date to Pi

  pinMode(ledPin, OUTPUT);
  digitalWrite(ledPin, LOW); // turn it off
}

void loop() {
  delay(100);
}

// function that executes whenever data is received from master
// this function is registered as an event, see setup()
void receiveEvent() {
  while (Wire.available()) { // loop through all but the last
    char c = Wire.read(); // receive byte as a character
    digitalWrite(ledPin, c);
  }
}

void requestEvent()
{

}

void ard_checkingIn()
{
Wire.write(Checking_In);
}
mega_8
// Wire Slave Receiver
// by Nicholas Zambetti <http://www.zambetti.com>

// Demonstrates use of the Wire library
// Receives data as an I2C/TWI slave device
// Refer to the "Wire Master Writer" example for use with this

// Created 29 March 2006

// This example code is in the public domain.

// 04-Feb-2018 mcarter adapted
#include <Wire.h>

const int ledPin = 13; // onboard LED
int ValueA3 = 0;
static_assert(LOW == 0, "Expecting LOW to be 0");
int Checking_In = 1;


void setup() {
  Serial.begin(9600);
  Wire.begin(0x18);                // join i2c bus with address #4

  Wire.onReceive(receiveEvent); // register event
  Wire.onRequest(requestEvent);  // send date to Pi
  Wire.onRequest(ard_checkingIn);  // send date to Pi

  pinMode(ledPin, OUTPUT);
  digitalWrite(ledPin, LOW); // turn it off
}

void loop() {
  delay(100);
}

// function that executes whenever data is received from master
// this function is registered as an event, see setup()
void receiveEvent() {
  while (Wire.available()) { // loop through all but the last
    char c = Wire.read(); // receive byte as a character
    digitalWrite(ledPin, c);
  }
}

void requestEvent()
{

}

void ard_checkingIn()
{
Wire.write(Checking_In);
}
ard_9
// Wire Slave Receiver
// by Nicholas Zambetti <http://www.zambetti.com>

// Demonstrates use of the Wire library
// Receives data as an I2C/TWI slave device
// Refer to the "Wire Master Writer" example for use with this

// Created 29 March 2006

// This example code is in the public domain.

// 04-Feb-2018 mcarter adapted
#include <Wire.h>

const int ledPin = 13; // onboard LED
int ValueA3 = 0;
static_assert(LOW == 0, "Expecting LOW to be 0");
int Checking_In = 1;


void setup() {
  Serial.begin(9600);
  Wire.begin(0x19);                // join i2c bus with address #4

  Wire.onReceive(receiveEvent); // register event
  Wire.onRequest(requestEvent);  // send date to Pi
  Wire.onRequest(ard_checkingIn);  // send date to Pi

  pinMode(ledPin, OUTPUT);
  digitalWrite(ledPin, LOW); // turn it off
}

void loop() {
  delay(100);
}

// function that executes whenever data is received from master
// this function is registered as an event, see setup()
void receiveEvent() {
  while (Wire.available()) { // loop through all but the last
    char c = Wire.read(); // receive byte as a character
    digitalWrite(ledPin, c);
  }
}

void requestEvent()
{

}

void ard_checkingIn()
{
Wire.write(Checking_In);
}
Ard_10
// Wire Slave Receiver
// by Nicholas Zambetti <http://www.zambetti.com>

// Demonstrates use of the Wire library
// Receives data as an I2C/TWI slave device
// Refer to the "Wire Master Writer" example for use with this

// Created 29 March 2006

// This example code is in the public domain.

// 04-Feb-2018 mcarter adapted
#include <Wire.h>

const int ledPin = 13; // onboard LED
int ValueA3 = 0;
static_assert(LOW == 0, "Expecting LOW to be 0");
int Checking_In = 1;


void setup() {
  Serial.begin(9600);
  Wire.begin(0x1a);                // join i2c bus with address #4

  Wire.onReceive(receiveEvent); // register event
  Wire.onRequest(requestEvent);  // send date to Pi
  Wire.onRequest(ard_checkingIn);  // send date to Pi

  pinMode(ledPin, OUTPUT);
  digitalWrite(ledPin, LOW); // turn it off
}

void loop() {
  delay(100);
}

// function that executes whenever data is received from master
// this function is registered as an event, see setup()
void receiveEvent() {
  while (Wire.available()) { // loop through all but the last
    char c = Wire.read(); // receive byte as a character
    digitalWrite(ledPin, c);
  }
}

void requestEvent()
{

}

void ard_checkingIn()
{
Wire.write(Checking_In);
}
Ard_11
// Wire Slave Receiver
// by Nicholas Zambetti <http://www.zambetti.com>

// Demonstrates use of the Wire library
// Receives data as an I2C/TWI slave device
// Refer to the "Wire Master Writer" example for use with this

// Created 29 March 2006

// This example code is in the public domain.

// 04-Feb-2018 mcarter adapted
#include <Wire.h>

const int ledPin = 13; // onboard LED
int ValueA3 = 0;
static_assert(LOW == 0, "Expecting LOW to be 0");
int Checking_In = 1;


void setup() {
  Serial.begin(9600);
  Wire.begin(0x1b);                // join i2c bus with address #4

  Wire.onReceive(receiveEvent); // register event
  Wire.onRequest(requestEvent);  // send date to Pi
  Wire.onRequest(ard_checkingIn);  // send date to Pi

  pinMode(ledPin, OUTPUT);
  digitalWrite(ledPin, LOW); // turn it off
}

void loop() {
  delay(100);
}

// function that executes whenever data is received from master
// this function is registered as an event, see setup()
void receiveEvent() {
  while (Wire.available()) { // loop through all but the last
    char c = Wire.read(); // receive byte as a character
    digitalWrite(ledPin, c);
  }
}

void requestEvent()
{

}

void ard_checkingIn()
{
Wire.write(Checking_In);
}
Ard_12
// Wire Slave Receiver
// by Nicholas Zambetti <http://www.zambetti.com>

// Demonstrates use of the Wire library
// Receives data as an I2C/TWI slave device
// Refer to the "Wire Master Writer" example for use with this

// Created 29 March 2006

// This example code is in the public domain.

// 04-Feb-2018 mcarter adapted
#include <Wire.h>

const int ledPin = 13; // onboard LED
int ValueA3 = 0;
static_assert(LOW == 0, "Expecting LOW to be 0");
int Checking_In = 1;


void setup() {
  Serial.begin(9600);
  Wire.begin(0x1c);                // join i2c bus with address #4

  Wire.onReceive(receiveEvent); // register event
  Wire.onRequest(requestEvent);  // send date to Pi
  Wire.onRequest(ard_checkingIn);  // send date to Pi

  pinMode(ledPin, OUTPUT);
  digitalWrite(ledPin, LOW); // turn it off
}

void loop() {
  delay(100);
}

// function that executes whenever data is received from master
// this function is registered as an event, see setup()
void receiveEvent() {
  while (Wire.available()) { // loop through all but the last
    char c = Wire.read(); // receive byte as a character
    digitalWrite(ledPin, c);
  }
}

void requestEvent()
{

}

void ard_checkingIn()
{
Wire.write(Checking_In);
}